Do not be discouraged, if you are not familiar with Continuous Integration (CI) or unittests. In plain English: your scripts are automatically validated whenever you make changes.
- Why should I care?
- Key components
- Essential GitHub Repository
- tests / __init__.py
- tests / base.py
- .github / workflows / maya_unittests.yml
- Adding your own tests
- Test results
- Example GitHub Repository
- example_code.py
- tests / test_transform.py
- tests / run_tests.bat
- .github / workflows / maya_unittests.yml
- Limitations
- Conclusion
Why should I care?
Good question, because it is more work up front. Do not click away just yet though. You save time in the long run and you need less cookie dough to cope with stress. Imagine a script/tool with thousands of lines of of code and you are tasked to adjust a core function. Which scenario would you prefer:
- Without unittests and CI:
You make the change and hope that nothing breaks. Depending on what is at stake, your stress level might range between “mildly bewildered” and “near heart-attack”. - With unittests and CI:
You make the change, wait for the testresults and go on with your life if everything is OK.
Basically: Unittests and CI allow you to make drastic changes to your code with the confidence that the functionality is still intact. Getting an error up-front is way nicer to debug than when your coordinator is breathing down your neck. Yikes!
Key components
Hopefully you are intrigued and want to try CI for yourself. Setting up unittesting and CI for Maya was incredibly tedious in the past and took me many days on multiple occasions. But things have changed, thanks to GitHub and Marcus Ottosson.
Since every reader comes from a different background I want to establish the necessary terms briefly. Skip what you are familiar with and look further into topics that do not quite make sense.
Version Control
Version Control allows you to retrieve previous states of your code and work on the same file with other people, without overriding each others work. Git is the granddaddy of version control. A Git-project is called a repository and it is basically a folder that allows you to store and retrieve previous states.
GitHub is an online platform for Git. It is free to use, well maintained and here to stay (Microsoft owns it, so it will not run out of funding any time soon).
GitHub Actions allow you to automate tasks, based on what is happening in your GitHub repository. They are part of the reason why CI for Maya got a whole lot easier and why I am writing this blog post, as you will see later.
If “Git” does not quite click yet; there is an endless amount of information & tutorials out there.
Unittest
It is a check for part of your script… A test for a unit of code… A unit is being tested… You get it; unittest.
Unittests work best if your functions are short and their inputs & outputs well defined – which is good programming practice anyways. One massive create_rig() function is hard to test. But when you are dealing with short, fundamental building blocks, testing becomes straight forward:
- create_joint(name) → Test: Does it create a joint with the correct name?
- snap_to_node(node) → Test: Does it properly snap to the given node?
- …
You could check functions manually whenever you change something, but that spirals out of control really quickly. How many functions would you be willing to test manually after every change you make? Ten? Five? I think I would already flip my table at three. Unittests are great, because you write a test once and from then it will be checked every single time. So instead of writing this 10 times:
print(create_joint(name))
You could write this once:
class TestJointMethods(unittest.TestCase):

    def test_joint_name(self):
        name = "nameForTheJoint"
        self.assertEqual(create_joint(name), name)
Every function should have a corresponding unittest that verifies whether it produces the expected output for a given input. In the Python unittest module that is called “asserting”.
A function “add” that sums up two numbers could have these assertions:
- add(1, 1) → should return 2
- add(1, “one”) → should raise a TypeError
Example code:
import unittest

def add(a, b):
    return a + b

class TestStringMethods(unittest.TestCase):

    def test_simple_add(self):
        self.assertEqual(add(1, 1), 2)

    def test_word_addition(self):
        with self.assertRaises(TypeError):
            add(1, "one")

if __name__ == "__main__":
    unittest.main()
Result:
# ..
# ----------------------------------------------------------------------
# Ran 2 tests in 0.002s
#
# OK
Side-note: You can push the test-mentality to the extreme by writing the test before the actual function (Test Driven Development). It forces you to think about what you expect from the function before mindlessly rushing into things.
Continuous Integration (CI)
CI is the practice of feeding your work back into the overall codebase often. Instead of working in isolation for days, weeks or even months, you commit your changes daily, or even multiple times a day. It is easier to integrate your work into the overall codebase continuously, instead of all at once at the very end, when the rest of the code might have changed.
All in one
So…
- Version Control takes care of versioning your scripts.
- Unittests let you check your functions automatically.
- Continuous Integration preaches to merge your changes often.
If you think that these three would go together reeeally well; you are not alone. In fact, “Continuous Integration” is often synonymous to:
Merge your scripts often and have them automatically tested.
Now we know everything to make sense of what this blog post is actually about: CI for Maya. I wanted to make it as easy as possible for you to get started. What took me literally weeks to set up in the past is now a minimalist GitHub repository you can fork or copy/paste from to get going within minutes:
Next we will look at what makes these repositories tick.
Essential GitHub Repository
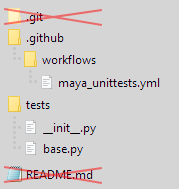
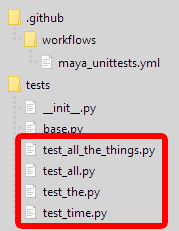
The bare minimum GitHub repository has the file structure on the left (ignore the unavoidable .git folder and README.md file).
I recommend that you keep the folders & files exactly as they are, to avoid any headaches.
The cool thing: GitHub will run tests automatically, once you have these files in place! No need for any additional configuration.
tests / __init__.py
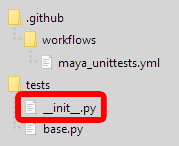
You probably know this, but just in case: the empty __init__.py file simply makes this folder accessible to Python.
Having a tests folder is good practice, to group all test related things in an obvious location.
tests / base.py
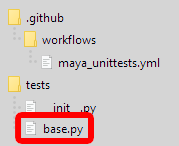
The base.py script takes care of the basics for writing your own tests:
- The path of your repository is added to Maya’s system, so your tests have access to your scripts.
- Tests are delayed until Maya is ready.
- The MayaBaseTestCase is the class to inherit for your own Maya tests.
"""Unittest base class module."""
import os
import sys

from unittest import TestCase

# Add repository base path to system paths, so Maya can access your scripts.
tests_path = os.path.dirname(os.path.realpath(__file__))
base_path = tests_path.rsplit(os.sep, 1)[0]
if base_path not in sys.path:
    sys.path.insert(0, base_path)

# Initialize Maya - otherwise tests run before Maya is ready!
import maya.standalone
maya.standalone.initialize()

from maya import cmds


class MayaBaseTestCase(TestCase):
    """Base class for all Maya unittests."""

    @classmethod
    def setUpClass(self):
        """Run for every Test-Class, before any method is executed."""
        cmds.file(newFile=True, force=True)

    def tearDown(self):
        """Run after every Test-Class method."""
        cmds.file(newFile=True, force=True)
Check the Python unittest documentation for more info.
.github / workflows / maya_unittests.yml
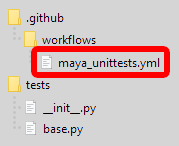
The name of this .yml file is not important, but the folder structure is! Anything under .github/workflows is interpreted by GitHub as something to do. That is why your tests will be run without any additional configuration; GitHub see – GitHub do 🙂
Your workflow(s) will be run based on the triggers you define. In this example I used [push, pull_request], which will run your tests any time you push or create a pull request on any branch.
# "name" is only used for labelling your workflow action in GitHub.
name: Example CI

# "on" specifies which events trigger this workflow to be run.
on: [push, pull_request]

# "jobs" is a list of things to do when this workflow is triggered.
jobs:
  # "maya2020" is the name of this job and completely arbitrary.
  maya2020:
    # "runs-on" specifies the operating system.
    runs-on: ubuntu-latest
    # "steps" defines what needs to be done in this job.
    steps:
    # "name" is the name of this step and completely arbitrary.
    - name: Checkout Code
    # "uses: actions/checkout@v2" gets your code from the repository.
      uses: actions/checkout@v2
    - name: Run Unittests
    # "uses: docker[...]" uses Marcus Ottosson's Docker images of Maya.
    # Basically; GitHub temporarily installs Maya in order to run your tests.
      uses: docker://mottosso/maya:2020
      # "with [...]" uses Maya's Python to run your unittests in /tests
      with:
        args: /usr/autodesk/maya/bin/mayapy -m unittest discover -s ./tests -v
Check the GitHub Workflow documentation for more info and Marcus Ottosson’s Docker Repo for all available Maya Docker images (=versions of Maya you can test with).
Adding your own tests
To write your own tests you simply add Python files with the prefix “test_” to the tests folder. I added one in the example repository.
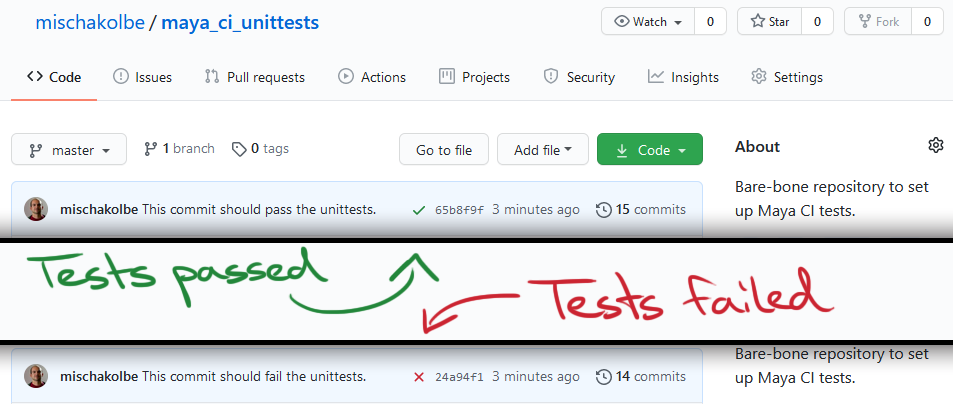
Test results
Whether your tests passed is indicated by a green tick ✔ or red cross ✘ at the top of the repository. If you see an orange dot • the tests are still running.
If you want to dig deeper, go to the Actions tab of your repository:
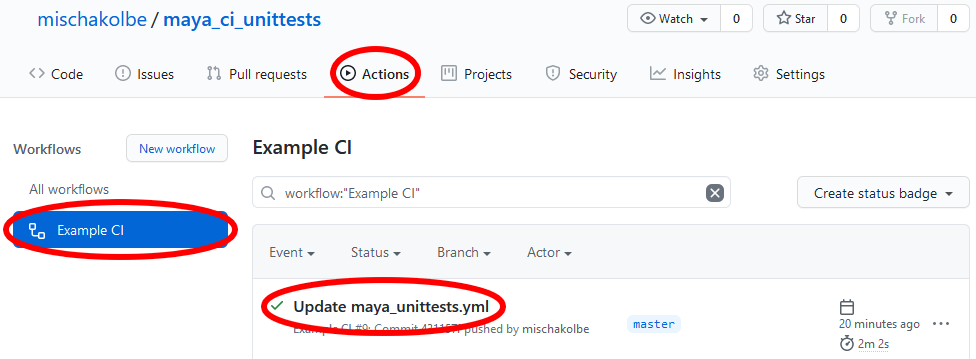
You can click on the event to see what happened. This is where you find the error log when things go wrong.

Example GitHub Repository
The GitHub repository with examples is the same as the one just described, except for these areas:
example_code.py
Some arbitrary Maya Python code to run tests on:
"""Example module."""
from maya import cmds


def make_transform(name="test"):
    """Create a named transform.. Exciting!
    Args:
        name (str): Name for the transform to be created.
    Returns:
        str: Name of the created transform
    """
    transform = cmds.createNode("transform", name=name)

    return transform
tests / test_transform.py
I added examples of various assertions in this file, but it could be as simple as this:
"""Example unittests."""
from base import MayaBaseTestCase

import example_code


class TestMakeTransform(MayaBaseTestCase):
    def test_node_name(self):
        """Test whether returned name is correct."""
        name = "TestTransform"
        self.assertEqual(example_code.make_transform(name=name), name)
tests / run_tests.bat
A little batch script that lets you run your tests locally. You can run the first line in a terminal directly, but sometimes I prefer to run an executable 😛
mayapy -m unittest discover -s . -v
pause
If you do not have mayapy setup as a system variable/alias you can replace it with the path to your mayapy executable. On Windows it is located here by default:
C:\Program Files\Autodesk\Maya20xxx\bin\mayapy.exe
.github / workflows / maya_unittests.yml
In the repo with examples I added all supported Maya Docker images, at the time of writing this post. The only version that does not seem to work is Maya 2013. Oh well… 🙂
Limitations
At the time of writing this post the example repositories only test on Linux and only work for Python scripts.
To test on Windows or Mac you would need to find/create Maya Docker images for those operating systems.
To test C++ plugins that need to be built you would probably have to look into CMake GitHub Actions, such as:
https://github.com/marketplace/actions/build-c-project
Conclusion
CI is only as good as your unittests! That juicy green check mark ✔ can give a false sense of security. If you are not testing the bit that fails… Well, you are f***ed as if you did not have CI.
But if you get into the habit of writing tests for the bugs you discover, you can at least ensure that you do not re-introduce previous issues. So even though you cannot foresee all bugs, you can test for the ones that occurred.
❤

One thought on “Continuous Integration for Maya Scripts”